Sunday, December 25, 2011

MacBook Air


The future of the notebook. Available now.

Designing MacBook Air came with one goal: Create an incredibly thin and light notebook computer that’s every bit as powerful and capable as one twice its size. With flash storage, durable unibody construction, Multi-Touch technology, and a long-lasting battery, MacBook Air not only achieves that goal, it sets a new standard for what every notebook should be. Perfected down to the millimeter.


Thin, light, durable. Thank you flash storage.Even at less than an inch thin, MacBook Air sets a pretty high standard — by making flash storage standard. Flash chips are very small, allowing MacBook Air to be incredibly thin and light. Flash is also solid state, meaning there are no moving parts. Which makes it reliable, durable, and quiet. And because we place the flash chips directly on the logic board, they take up much less space — about 90 percent less, in fact. That creates room for other important things, like a bigger battery. So you have a notebook that weighs almost nothing and runs for hours on a single charge. That’s mobility mastered.

The best way to Multi-Touch on a notebook.

Multi-Touch technology is part of practically every Apple product. It’s the best and most personal way to interact with your devices. And the optimal way to experience Multi-Touch on a notebook is through a trackpad. That’s precisely the case with MacBook Air. The trackpad’s spacious, all-glass surface doesn’t have a button because the whole thing is the button. And with new Multi-Touch gestures in OS X Lion, you can interact with MacBook Air in ways that feel more intuitive and realistic than ever before.

Saturday, December 24, 2011

Linksys WRT160N Wireless-N Router


The speed and bandwidth of Wireless-N, today's most advanced wireless technology, makes it easy for multiple users to share Internet access, files and printing. Enjoy media-intensive activities like gaming, video and Voice-over-IP phone calls - all at once, with less lag and performance degradation.

Experience coverage you can count on, all around your home. Wireless-N's Multiple in, Multiple Out MIMO technology actually uses the signal reflections that confuse ordinary wireless technologies to boost range and reduce dead spots.

Four 10/100 Ethernet ports let you connect printers, networked storage drives, and other Ethernet-enabled devices to your network, so you can access and share them wirelessly from all your computers at once. No need to trade cables, or wait for someone else to finish their work before you do yours.

Advanced wireless security and SPI firewall protection is designed to help safeguard your home network and computers from most Internet attacks. Includes a 30-day free trial of Home Network Defender, designed to help protect you and your family against cybercriminals and online predators by stopping threats before they get into your home network.
*Maximum performance derived from IEEE Standard 802.11 specifications. Actual performance can vary, including lower wireless network capacity, data throughput rate, range and coverage. Performance depends on many factors, conditions and variables, including distance from the access point, volume of network traffic, building materials and construction, operating system used, mix of wireless products used, interference and other adverse conditions.

Saturday, December 17, 2011

GIGABYTE GA-X79-UD7


CPU
  1. Support for Intel® Core™ i7 processors in the LGA2011 package
  2. L3 cache varies with CPU
(Please refer "CPU Support List" for more information.)
Chipset
  1. Intel® X79 Express Chipset
Memory
  1. 4 x 1.5V DDR3 DIMM sockets supporting up to 32 GB of system memory
    * Due to Windows 32-bit operating system limitation, when more than 4 GB of physical memory is installed, the actual memory size displayed will be less than 4 GB.
  2. 4 channel memory architecture
  3. Support for DDR3 2133/1866/1600/1333/1066 MHz memory modules
  4. Support for non-ECC memory modules
  5. Support for Extreme Memory Profile (XMP) memory modules
(Please refer "Memory Support List" for more information.)
Audio
  1. Realtek ALC898 codec
  2. High Definition Audio
  3. 2/4/5.1/7.1-channel
  4. Support for Dolby® Home Theater
  5. Support for S/PDIF Out
LAN
  1. 1 x Intel GbE LAN (10/100/1000 Mbit)
Expansion Slots
  1. 2 x PCI Express x16 slots, running at x16 (PCIEX16_1, PCIEX16_2)
    * For optimum performance, if only one PCI Express graphics card is to be installed, be sure to install it in the PCIEX16 slot.
  2. 2 x PCI Express x16 slot, running at x8 (PCIEX8_1, PCIEX8_2)
    * The PCIEX8_2 slot shares bandwidth with the PCIEX16_2 slot. When the PCIEX8_2 slot is populated, the PCIEX16_2 slot will operate at up to x8 mode.
    (All PCI Express x16 slots conform to PCI Express 3.0 standard.)
  3. 3 x PCI Express x1 slots
    (All PCI Express x1 slots conform to PCI Express 2.0 standard.)
Multi-Graphics Technology
  1. Support for 4-Way/3-Way/2-Way AMD CrossFireX™/NVIDIA SLI technology
    The PCIEX16 slots operate at up to x8 mode when 4-Way/3-Way AMD CrossFireX™/NVIDIA SLI is enabled.
Storage InterfaceChipset:
  1. 2 x SATA 6Gb/s connectors (SATA3 0/1) supporting up to 2 SATA 6Gb/s devices
  2. 4 x SATA 3Gb/s connectors (SATA2 2/3/4/5) supporting up to 4 SATA 3Gb/s devices
  3. Support for RAID 0, RAID 1, RAID 5, and RAID 10
    * When a RAID set is built across the SATA 6Gb/s and SATA 3Gb/s channels, the system performance of the RAID set may vary depending on the devices being connected.
2 x Marvell 88SE9172 chips:
  1. 4 x SATA 6Gb/s connectors (GSATA3 6/7/8/9) supporting up to 4 SATA 6Gb/s devices
  2. Support for SATA RAID 0 and RAID 1
USBChipset:
  1. Up to 14 USB 2.0/1.1 ports (8 ports on the back panel, 6 ports available through the internal USB headers)
2 x Fresco FL1009 chips:
  1. Up to 4 USB 3.0/2.0 ports (2 ports on the back panel, 2 ports available through the internal USB header)
Internal I/O Connectors
  1. 1 x 24-pin ATX main power connector
  2. 2 x 8-pin ATX 12V power connectors
  3. 2 x PCIe power connectors
  4. 6 x SATA 6Gb/s connectors
  5. 4 x SATA 3Gb/s connectors
  6. 1 x CPU fan header
  7. 6 x system fan headers
  8. 1 x front panel header
  9. 1 x front panel audio header
  10. 1 x S/PDIF Out header
  11. 3 x USB 2.0/1.1 headers
  12. 1 x USB 3.0/2.0 header
  13. 1 x Clear CMOS jumper
  14. 1 x power button
  15. 1 x reset button
  16. 1 x onboard voltage measurement module
  17. 1 x Gear button
  18. 1 x CPU BCLK Down button
  19. 1 x CPU BCLK Up button
  20. 1 x CPU Ratio Down button
  21. 1 x CPU Ratio Up button
  22. 1 x Trusted Platform Module (TPM) header
Back Panel Connectors
  1. 1 x PS/2 keyboard/mouse port
  2. 1 x CPU overclocking button
  3. 1 x BIOS switch button
  4. 1 x Clear CMOS button
  5. 8 x USB 2.0/1.1 ports
  6. 2 x USB 3.0/2.0 ports
  7. 1 x RJ-45 port
  8. 1 x optical S/PDIF Out connector
  9. 5 x audio jacks (Center/Subwoofer Speaker Out, Rear Speaker Out, Side Speaker Out, Line In, Mic In, Line Out)
I/O Controller
  1. iTE IT8728 chip
H/W Monitoring
  1. System voltage detection
  2. CPU/System temperature detection
  3. CPU/System fan speed detection
  4. CPU overheating warning
  5. CPU/System fan fail warning
  6. CPU/System fan speed control
    * Whether the CPU/system fan speed control function is supported will depend on the CPU/system cooler you install.
BIOS
  1. 2 x 64 Mbit flash
  2. Use of licensed AMI EFI BIOS
  3. Support for DualBIOS™
  4. PnP 1.0a, DMI 2.0, SM BIOS 2.6, ACPI 2.0a
Unique Features
  1. Support for @BIOS
  2. Support for Q-Flash
  3. Support for Xpress BIOS Rescue
  4. Support for Download Center
  5. Support for Xpress Install
  6. Support for Xpress Recovery2
  7. Support for EasyTune
    * Available functions in EasyTune may differ by motherboard model.
  8. Support for Smart 6™
  9. Support for eXtreme Hard Drive (X.H.D)
  10. Support for ON/OFF Charge
  11. Support for Cloud OC
  12. Support for 3TB+ Unlock
  13. Support for TouchBIOS
  14. Support for Q-Share
Bundle Software
  1. Norton Internet Security (OEM version)
Operating System
  1. Support for Microsoft® Windows 7/Vista/XP
Form Factor
  1. XL-ATX Form Factor; 32.4cm x 25.3cm
Remark
  1. Due to different Linux support condition provided by chipset vendors, please download Linux driver from chipset vendors' website or 3rd party website.
  2. Most hardware/software vendors may no longer offer drivers to support Win9X/ME/2000/XP SP1/SP2. If drivers are available from the vendors, we will update them on the GIGABYTE website.
    * The entire materials provided herein are for reference only. GIGABYTE reserves the right to modify or revise the content at anytime without prior notice.
    * Advertised performance is based on maximum theoretical interface values from respective Chipset vendors or organization who defined the interface specification. Actual performance may vary by system configuration.
    * All trademarks and logos are the properties of their respective holders.
    * Due to standard PC architecture, a certain amount of memory is reserved for system usage and therefore the actual memory size is less than the stated amount.

    Sunday, December 11, 2011

    MARS II/2DIS/3GD5 ROG MARS II – the fastest card with powerful cooling


    • The fastest card ever to deliver a 22% performance boost than generic GTX590
    • Individually laser-carved and sequentially-numbered aluminum plate certifies limited edition status, making the 1000 pcs MARS II collector’s item
    • Dual 12cm fan for 600% greater air flow and DirectCU II direct contact design for 20% cooler performance

    Specifications

    Graphics EngineNVIDIA GeForce GTX 580x2
    Bus StandardPCI Express 2.0
    Video MemoryGDDR5 3GB
    Engine Clock782 MHz
    CUDA Core1024
    Memory Clock4008 MHz ( 1002 MHz GDDR5 )
    RAMDAC400 MHz
    Memory Interface384-bit x2
    ResolutionD-Sub Max Resolution : 2048x1536
    DVI Max Resolution : 2560x1600
    InterfaceD-Sub Output : Yes x 1 (via DVI to D-Sub adaptor x 1)
    DVI Output : Yes x 2 (DVI-I)
    HDMI Output : Yes x 1 
    Display Port : Yes x 1 (Regular DP)
    HDCP Support : Yes
    Accessories1 x Extended SLI cable
    2 x Power cable
    1 x DVI to D-Sub adaptor
    SoftwareASUS Driver and Utility
    ASUS FeaturesDirectCU Series
    Super Alloy Power
    Dimensions13 " x 6.2 " x 2.5 " Inch
    NoteIf you are planning to use two MARS II for Quad SLI , Rampage III Extreme or Rampage III Black Edition is required. This is recommended for the best performance via dual x16 PCIE and best cooling operation. 


    Wednesday, December 7, 2011

    HOW TO INSTALL UBUNTU


    HOW TO INSTALL UBUNTU : THE UBUNTU INSTALLATION GUIDE


    The Ubuntu installation guide: last updated September 2009
    Table of contents
    When it comes to installing popular Linux flavour  Ubuntu, there are so many useful snippets of information on blogs and guides all over the internet. If you Google “How to install Ubuntu”, you’ll see what I mean.
    For an Ubuntu beginner or curious Windows intermediate user however, there’s no single, simple source of information when it comes to trying out your first Ubuntu installation. One thing I have noticed is that there’s a lot of technical jargon and sometimes unnecessary terminal commands in lengthy forum posts, but no simple “how to” guides, which I think  might put some people off! A shame, when you think about how easy Ubuntu is to install, use and tweak to look really cool!
    This post will talk you through your first Ubuntu installation, hopefully teaching you everything you need to know to give Ubuntu a try without breaking or removing your existing Windows installation. The end result will be a “vanilla” Ubuntu Installation running simultaneously with your Windows installation using either the GRUB bootloader, or WUBI, depending on how far you’d like to go on your first Ubuntu experience.
    I hope my guide makes installing Ubuntu an enjoyable, simple experience. By the end of the guide you should have a dual boot Windows / Ubuntu machine that happily plays music, video, and acts as a perfectly usable home office computer with Openoffice 3.0. For the really adventurous you could even run Windows XP inside Virtualbox, which is linked to later on in the guide.  The Ubuntu OS is unique and seriously cool, so, enjoy the trip.
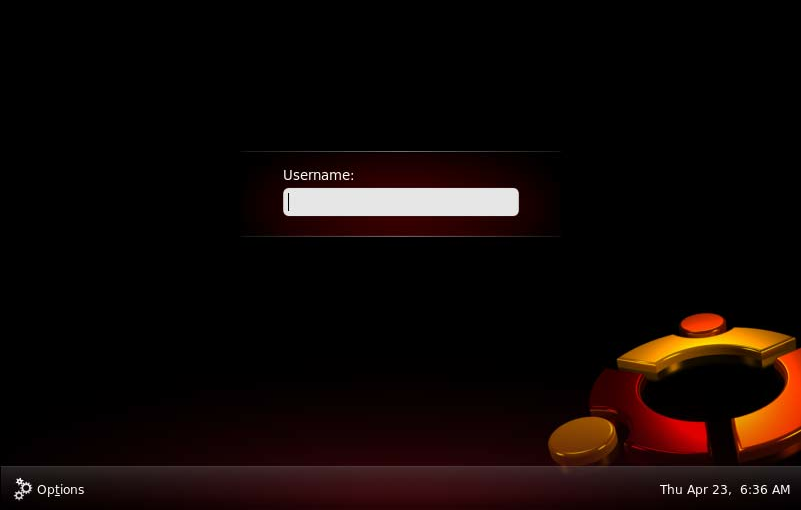
    The all new Ubuntu login screen
    If you’re planning on installing the latest version of Ubuntu (Jaunty Jackalope 9.04) you can install Ubuntu straight from the CD inside Windows or from a USB stick and the install process can takes care of formatting your hard drive partition for you. You might not yet have a spare partition to do this, so I’ve covered shrinking your existing Windows partition to make space for Ubuntuhere.
    How to install Ubuntu from CD
    1) Download the Ubuntu ISO from http://www.ubuntu.com/getubuntu/download and save to your desktop
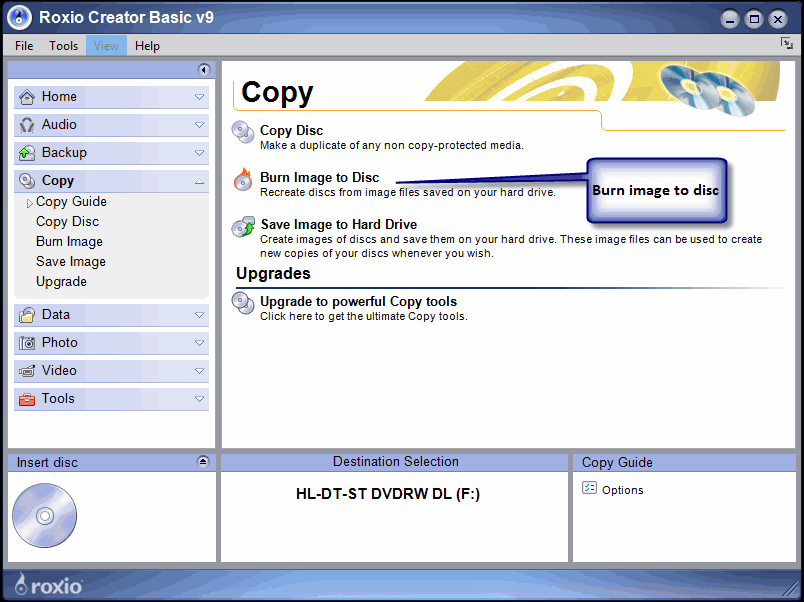
    2) Burn the ISO image to a blank CD using Roxio CD creator or similar:
    burn a disc image with roxio
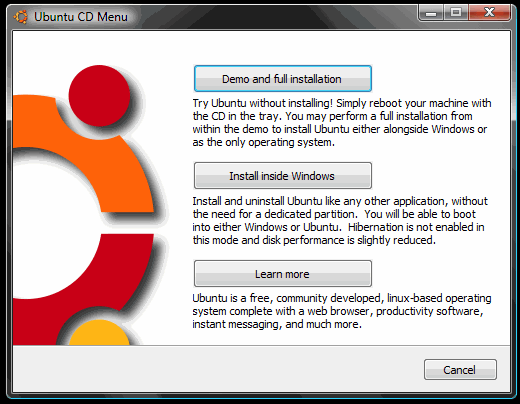
    3) Run the CD from “My Computer” – the CD should ask permission to run at which point you’ll see this option screen:
    Install Ubuntu with Wubi
    4) If you’d like to install Ubuntu using Wubi, select “install inside Windows” and follow the instructions. Installing with WUBI is ideal for a first taste of Ubuntu as you can remove from add/remove programs in Windows later on. This install process is really easy but you don’t get the same performance as if Ubuntu had a separate partition running on its EXT3 file system. The following screens are all based on the Wubi installer process, so you can follow the rest of the instructions below.
    If you’d like to install Ubuntu separately to Windows, then skip to point 7) below.
    Here’s what you see next:
    Wubi installer
    If you’ve got the space on your hard drive, go for 30gb or more for the installation size.
    5) Now configure your installation using the simple settings options. You can specify the location of the Ubuntu installation on your Windows partition, the size of the Ubuntu installation, the Ubuntu flavour (Ubuntu, Kubuntu, Xubuntu, etc), your preferred language, and a username and password for the Ubuntu system.
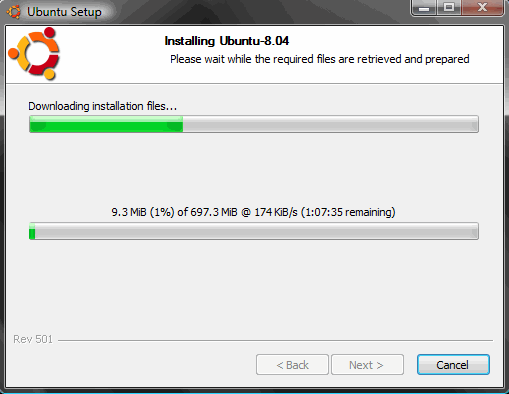
    When you click install, you’ll see this screen:
    As soon as the files have finished downloading, you’ll see this:
    Time to reboot Wubi installer
    6) That’s it! Click reboot now, and select “Ubuntu” on the startup screen. You now have a fully functional dual boot Windows / Ubuntu machine.
    Install Ubuntu on a single (EXT3) partition (separately to Windows)
    7) Click “Demo and full installation” and your computer will restart and boot into Ubuntu.
    It’s worth saying at this point that you’re about to install Ubuntu on an entirely separate drive partition. That means, you need to make sure you have enough space on your computers hard drive to accomodate the new setup. Keir Thomas found that a partition less than 4gb would lead Ubuntu to crash during install in his first look at Ubuntu 9.04 over at Lifehacker.
    Here’s a guide on how to resize or shrink your Windows Vista partition. Follow those instructions before you reboot into the live version of Ubuntu and you’ll have a really easy time during the following steps. Maybe you’d like to install from a USB? Let’s have a quick look at the process of installing from a USB before we continue:
    Here’s how to install Ubuntu on a USB drive from Windows Vista:
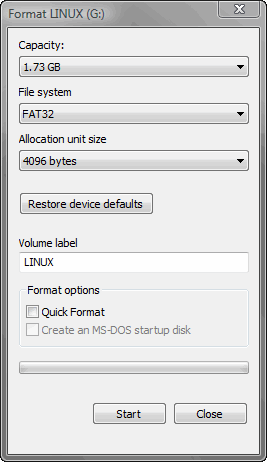
    8) Format your USB stick with a FAT32 partition from Windows. You can get to the format dialogue by opening My Computer and right mouse clicking the removable drive icon. Click “Format” and follow the settings in the image below. You need a minimum 2gb USB stick.
    format your USB drive in Windows Vista
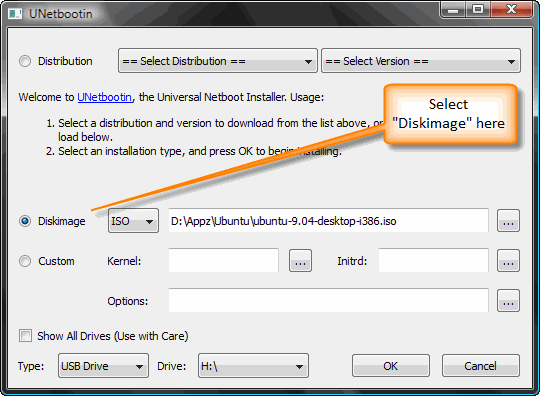
    9) Download UnetBootin. UNetbootin allows for the installation of various Linux/Ubuntu distributions to a partition or USB drive, so it’s no different from a standard install, only it doesn’t need a CD. The coolest thing about the application is that it’s a “portable” app. You don’t need to install it into Windows meaning UNetbootin will run on your Windows PC without “admin” privileges.
    using unetbootin to install the new ubuntu jaunty jackalope
    The new version of Ubuntu isn’t in the Distribution list supplied with UNetbootin yet, so use the downloaded Ubuntu ISO from earlier on. Add the ISO using the “Diskimage”, make sure your USB drive is selected below and click OK.
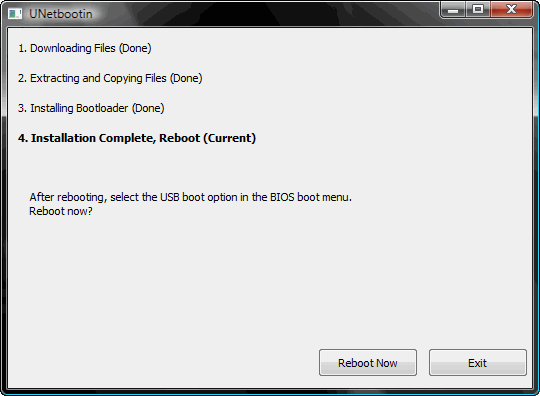
    The ISO transfers to the USB pretty quickly, so soon after you click OK you’ll see this screen:
    unetbootin complete
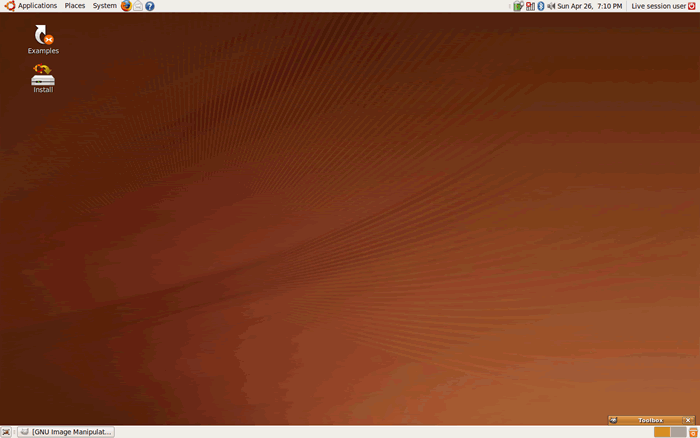
    10) That’s it – when the installation process is complete, restart your computer and make sure it’s set up to boot from USB. On my HP Laptop, pressing F9 on the boot screen shows a boot order menu. Selecting “USB Hard Drive” follows a black screen, an Ubuntu logo, and finally, your new Ubuntu desktop appears.
    Completing your Ubuntu installation, step by step
    Installing Ubuntu is so easy that it requires very little effort past this point. If you’ve managed to repartition your hard drive and restart your computer you’ll sail through the next few steps:
    11) Click “install” on the live desktop (top left)
    vanilla Ubuntu desktop
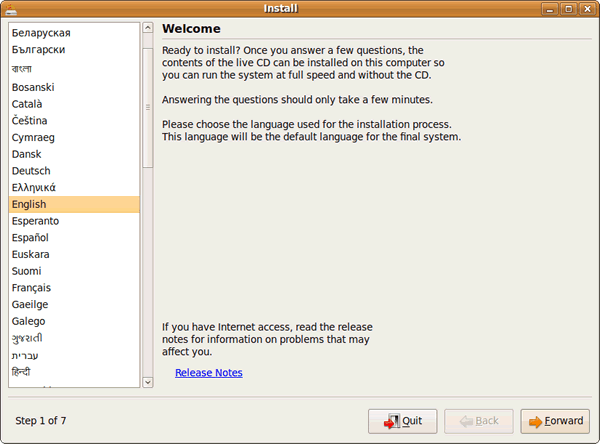
    12) Choose your language in the welcome screen
    welcome1
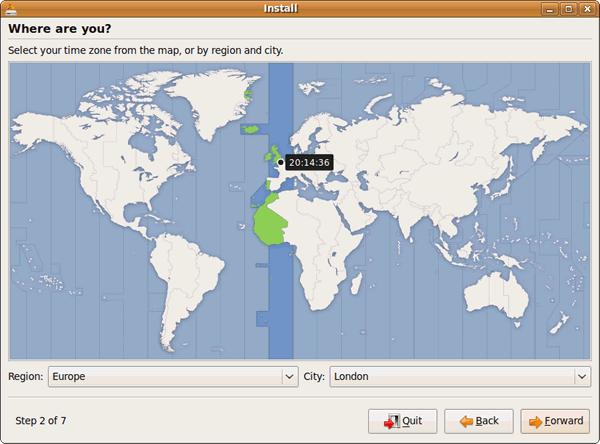
    13) Choose your location
    Choose location
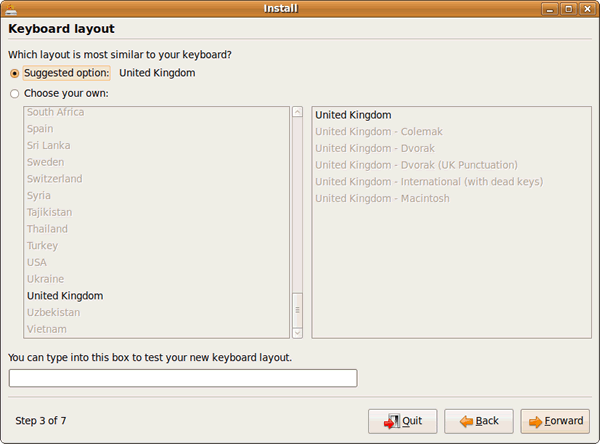
    14) Choose your keyboard layout
    welcome31
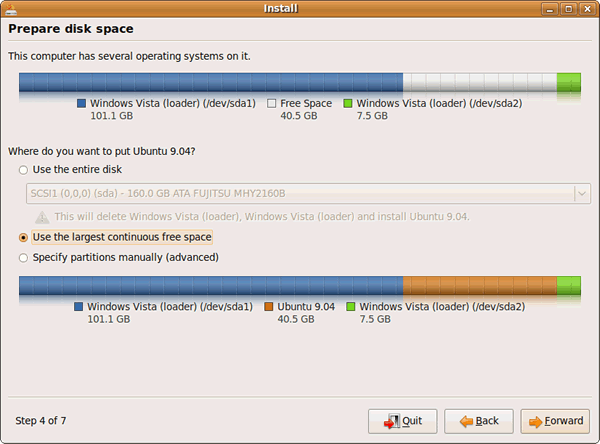
    15) Set up your disk partition. This is probably the most “technical” part of the installation. When I shrunk my Windows Vista drive volume, I never formatted the new partition, which means the “use the largest continuous free space” option works nicely:
    Set up a disk partition for Ubuntu
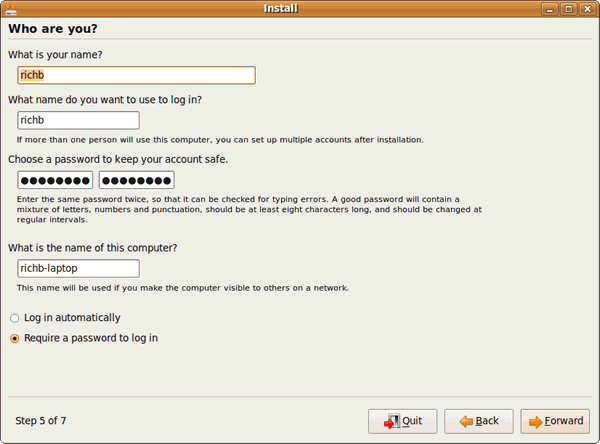
    16) Choose your username and password:
    Choose your Ubuntu Password
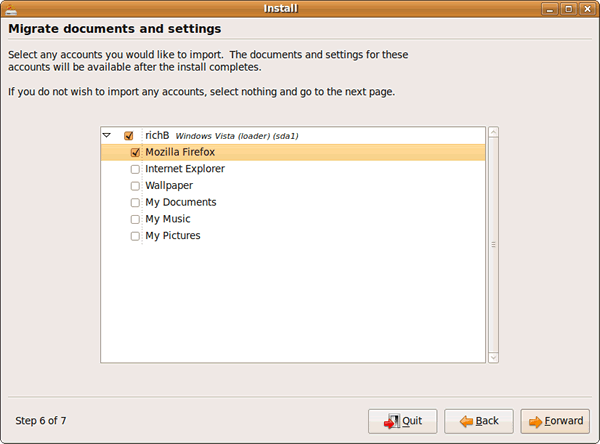
    17) Migrate your Windows documents and settings
    Migrate your Windows settings
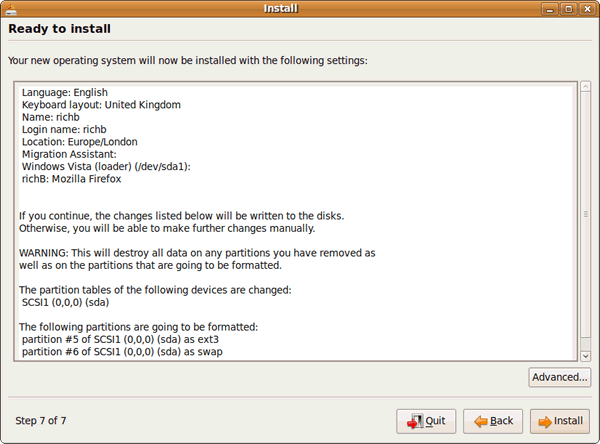
    18) You’re now ready to install your new Ubuntu installation
    Ready to install
    19) When the installation has finished, restart your computer (you’ll be instructed to remove your cd rom or USB drive). You’re now ready to begin using Ubuntu!
    Useful tips and resources for Ubuntu
    Over the months, I’ve compiled a number of useful tips and hints to get you started in using your new operating system. Here’s a few that people have found most useful:
    When you first login you’ll notice the system beep is a little annoying. Here’s how to turn it off. Having problems setting up your wireless networkUse this guide to set it up. Want to run Office 2007 or Windows XP from inside Ubuntu? Use this guide toinstall Virtualbox. Want to have that amazing 3d cube desktop? You’ll need to install Compiz. Want to make your installation look absolutely amazing? Check this post for a beautifully minimalist Ubuntu desktop powered by Conky. Finally, why not try installing boxee inside Ubuntu to watch a lot of great, free TV!
    Ubuntu is a brilliantly simple, easy to use, free and powerful operating system. I hope this guide helps you get on your way. Any feedback? Leave comments below.